However, a lot of users that haven’t obtained 1709 version yet, are stuck with an incredibly unyielding problem which prevents the upgrade.
This error goes by the code 0x80070714 and it’s easily identified as the ERROR_RESOURCE_DATA_NOT_FOUND codename.
If this error trapped you in the never-ending upgrade loop, make sure to check the steps we provided below.
How do I resolve upgrade error 0x80070714 in Windows 10?
1: Run Update troubleshooter
First things first. Even though this might seem like an unfitting workaround for the grave issue at hand, it might help you, nonetheless.
Windows Update Troubleshooter will, upon running, reset various related services and it might address your problem.
However, don’t hold high hopes, since this error mostly occurs when upgrading to major updates, thus it’s harder to address it than usual.
Here’s how to run Windows Update troubleshooter:
- Press Windows key + I to summon the Settings app.
- Select Update & Security. alt=»windows 10 error 0x80070714″ width=»720″ height=»360″ />
- Then select Troubleshoot from the left pane.
- Expand Windows Update Troubleshooter and click ”Run the troubleshooter”. alt=»windows 10 error 0x80070714″ width=»720″ height=»360″ />
- Wait for the restoring process to end and restart your PC.
2: Reset update services
Most of the time, the problem with the update errors in general concerns update-related services that tend to get stuck or unresponsive.
Furthermore, the folder in which all update-related files are stored and installed can be an issue, as well.
Installation files tend to get corrupted or incomplete, especially if there’s a presence of malware on your system.
For that reason, it’s advised to restart update services and delete the content from the Software Distribution folder. Here’s how to do it:
- In the Windows Search bar, type cmd.
- Right-click the Command Prompt and run it as an administrator.
- In the command-line, copy-paste the following commands and press Enter after each:
-
- net stop wuauserv
- net stop bits
- net stop cryptsvc
- Ren %systemroot%SoftwareDistribution SoftwareDistribution. bak
- Ren %systemroot%system32catroot2 catroot2.bak alt=»windows 10 error 0x80070714″ width=»720″ height=»360″ />
- net start wuauserv
- net start bits
- net start cryptsvc
-
- Restart your PC and try updating again.
Also, some knowledgeable users suggested disabling SQL service in Services. Allegedly, it seems that SQL blocks the upgrade for some reason. Here’s how to disable it:
- In the Windows Search bar, type services, and open Services.
- Disable all Microsoft SQL services you can find and try updating again.
3: Run DISM
If none of the previous steps get you out of a slump, the next obvious step is to utilize DISM.
Run a System Scan to discover potential errors


Click Start Scan to find Windows issues.

Click Repair All to fix issues with Patented Technologies.
Deployment Image Servicing and Management tool is the advanced troubleshooting built-in tool run through the command-line.
This tool’s main use is to, by employing system resources or an external source, locate and fix critical errors in system files.
As we already said, the corruption in update-related files is quite common, especially if the update size is as overwhelming as it is with major Creators updates.
Here’s how to run DISM in Windows 10, as simplified as it can be:
- Type cmd in Search, right-click on the Command Prompt and run it with the administrative permissions.
- In the command line, copy-paste these lines one by one and press Enter after each:
- DISM /online /Cleanup-Image / ScanHealth
- DISM /Online /Cleanup-Image /RestoreHealth
- Wait until the procedure ends (it might take up to 10 minutes).
- Restart your PC.
4: Use Media Creation Tool
If you’re unable to overcome the 0x80070714 error with the standard update procedure, there are still alternatives you can turn to.
Namely, Microsoft offers the Media Creation Tool which can be used to override the standard OTA updates.
Furthermore, you can use this tool to download and install the latest system version manually.
Follow these steps to do so:
- Download Media Creation Tool by following this link.
- Right-click on the tool and choose to run it as an administrator.
- Accept the Licence Terms .
- Now, choose to Upgrade this PC.
- Wait until all files are downloaded and the installation should start afterward.
5: Install updates via the installation media
In case even that fails, you can, by using the same tool, create an external install media , and install updates that way. This should exclude the possible issues within the system resources.
That way, you’ll use the data on the bootable USB or an ISO drive to install updates, rather than utilizing the system services mainly.
Here’s how to do it in a few steps:
- Download the Media Creation Tool from here.
- Plug in the USB flash drive with at least 4 GB.
- Run Media Creation Tool and accept the License Terms. alt=»windows 10 error 0x80070714″ width=»632″ height=»500″ />
- Choose Create installation media (USB flash drive, DVD, or ISO file) for another PC. alt=»windows 10 error 0x80070714″ width=»632″ height=»500″ />
- Select the preferred language, architecture, and edition and click Next. alt=»windows 10 error 0x80070714″ width=»632″ height=»500″ />
- Choose USB flash drive and then click Next .
- Media Creation Tool will download the setup and copy the installation files onto the USB flash drive.
- Finally, restart your PC.
- Plug in USB and start the Setup.
6: Perform a clean reinstallation
In the end, if none of the previous steps worked, the only thing that comes to my mind is to advise you to reinstall the system clean or to disable major updates and stick with the previous Windows iteration.
The former is, of course, not a preferable step, taking into consideration that you’ll lose all of your customized preferences and applications.
On the other hand, you can disable major updates temporarily, and avoid further issues. Here’s how to do it in Windows 10:
- Open Settings.
- Choose Updates & Security. alt=»windows 10 error 0x80070714″ width=»720″ height=»360″ />
- Select Advanced options under the Windows Update. alt=»windows 10 error 0x80070714″ width=»720″ height=»360″ />
- Scroll down and toggle on Pause updates alt=»windows 10 error 0x80070714″ width=»720″ height=»360″ />
That should be it. In case you have a better alternative to our solutions or questions regarding the error code 0x80070714, we encourage you to share them in the comments section below.

Still having issues?
Fix them with this tool:
Ошибка 0x80070570 при установке Windows
Внимание! Данная ошибка индицируется в двух случаях:
- при установке Windows — решение описано в данной статье.
- при копировании / перемещении / вырезании / вставке файлов на Flash-диск — решение дано в этой статье.
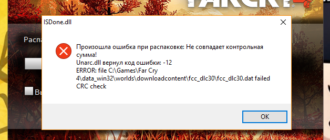
Описание кода ошибки 0x80070570 при установке Windows:
Иногда при установке Windows, индицируется ошибка 0×80070057. Обычно (но не всегда), основных проблем из-за которых она появляется — три:
- Неисправность модуля оперативной памяти.
- Неисправность материнской платы (редко) или жесткого диска (часто). К этому пункту, также относятся неисправности интерфейсных кабелей (шлейфов).
- Несоответствие контрольной суммы ISO-образа — записанный образ DVD на диск или flash-карту «битый», либо не корректно записан.
1. Проверка оперативной памяти.
Данная ошибка очень часто появляется при неисправности модулей оперативной памяти. Проверьте, правильно ли они установлены, до конца ли вставлены. Если вы не обнаружили проблем с правильностью их установки, Выньте все модули кроме одного. Проверьте оставшийся программой MemTest, и так каждый модуль по отдельности и определите сбойный.
2. Проблемы с жестким диском.
2.1 Проверьте интерфейсные кабеля (шлейфы).
Попробуйте подключить кабель SATA к другому разъему на материнской плате, а лучше замените SATA-кабель на заведомо исправный (новый). В большинстве случаев, дешевые SATA-кабеля, первое время гибкие и эластичные. Со временем, от перепада температур и пыли, кабель теряет эти свойства, становится хрупким, ломким, и приходит в негодность. Еще одна проблема дешевых SATA-кабелей, это расширение стенок Г-образного разъема.
2.2 Проверьте файловую систему жесткого диска.
Проверьте ваш жесткий диск на наличие ошибок. Для этого откройте командную строку и введите следующую команду:
chkdsk c: /r
Это можно сделать в консоли восстановления. Как попасть в консоль, подробно описано в этой статье.
2.3 Проверьте поверхность жесткого диска на наличие сбойных секторов.
Проверьте поверхность жесткого диска на наличие битых (bad) секторов. Проверить можно при помощи LiveCD такими программами как Viktoria и MHDD. Прочитайте руководства для этих программ.
3. Некорректная запись образа на носитель.
Если вы используете диск, с которого устанавливали Windows ранее, проверьте его на наличие царапин и загрязнений. Если вы устанавливаете операционную систему с этого диска впервые, возможно он некорректно записан, или образ поврежден.
3.1. Проверка контрольной суммы образа диска.
Если вы скачали образ с Интернета, нужно проверить его контрольную сумму. Для этого воспользуйтесь программой HashTab скачав ее с неОшибка. Ру. Она добавит в окно свойств файлов новую вкладку, на которой просчитываются контрольные суммы файлов, в том числе и образов, которые нужно сравнить с указанными на сайте, откуда вы качали образ или находящимися в архиве с образом.

Результат работы программы HashTab.
Если контрольные суммы образа не соответствуют, перекачайте образ заново. Потом снова сверьте. Образы лучше всего скачивать такими программами как uTorrent. Она сама просчитывает контрольные суммы скачиваемых файлов, и перекачивает ту часть, которая скачалась с ошибкой.
3.2. Запись образа на на CD-DVD, flash-карту.
3.2.1 Запись образа на диск CD-DVD с помощью программы UltraISO.
Итак, образ скачан, контрольные суммы проверены. Предстоит запись на носитель. Если вы хотите записать образ на CD-DVD-диск, вы можете воспользоваться любой из удобных вам программ: Nero, UltraISO, Alcohol120% и т. д.
Итак, например вы решили воспользоваться программой UltraISO. Вставьте чистый диск в привод (желательно использовать качественные диски Verbatim, TDK).
Идем в меню «Файл» => «Открыть…».

Выбираем скачанный нами образ. Затем нажимаем на значок «Запись».
Перед вами откроется окно выбора параметров записи. Здесь, вы можете выбирать привод на который будет вестись запись, и выбрать ее скорость:
- 4х — очень медленная, но дает самый лучший результат.
- 8х — недолго и качественно.
- 16х — диск может быть не читаем даже сразу после записи.
Затем жмем кнопку <Записать>.

После всех вышеописанных действий получаем качественно записанный диск.
3.2.2 Запись образа на USB Flash-карту при помощи программы UltraISO.
Если вы решили сделать загрузочную flash-карту с Windows 7, 8, вам поможет та же UltraISO, а процесс будет очень напоминать запись диска.
Идем в меню «Файл» => «Открыть…».
Выбираем скачанный нами образ.

Идем в меню «Самозагрузка» и выбираем пункт «Записать образ Жесткого диска…»В открывшемся окне выбираем из выпадающего списка нужную flash-карту и метод записи USB-HDD+, при необходимости прямо здесь форматируем устройство, и нажимаем кнопку <Записать>. В некоторых случаях лучше использовать метод записи USB-HDD.

На выходе получаем загрузочную флешку с Windows.
Вероятнее всего, что один из способов окажется для Вас полезным, или хотя бы поможет выявить причину ошибки 0×80070570 при установке ОС Windows.
Если вы знаете еще какие нибудь способы борьбы с ошибкой 0×80070570 или ее более точное описание, мы будем признательны если вы нам об этом расскажете.
https://windowsreport. com/windows-10-error-0x80070714/
https://neoshibka. ru/oshibka-0x80070570-pri-ustanovke-windows/